
INTRODUCTION
There are different reasons for non-adaptation in progressive lenses. The aim of this article is to determine the origin of a non-adaptation.
There are five main elements to consider in front of a non-adaptation:
- User
- Frame
- Lenses
- Beveling
- Design
It is important to have a list of the different checks that should be considered in each of the different elements mentioned.
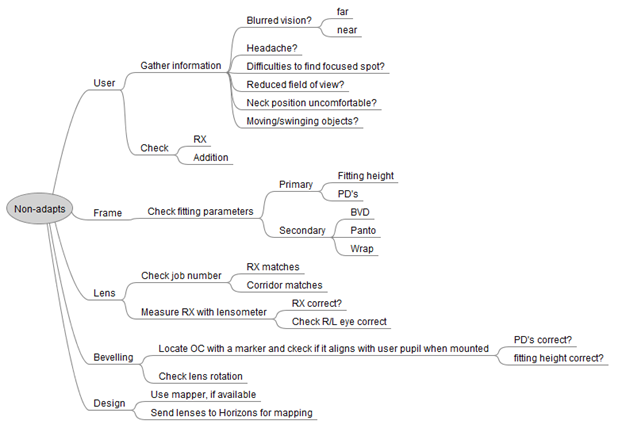
Image 1: Non-adapts checks.
USER & FRAME
For each element there are some key points to consider achieving the best lens performance and avoiding non-adaptations.
- USER
Firstly, the professional must collect the maximum information about each specific user to understand which problems are experiencing.
Specifically, understand the visual problems at far, intermediate, and near, if is having blur vision, feeling dizzy or other visual symptomatology.
When the professional understands properly the user problems, it can follow up the appropriate workflow to find the main cause of its non-adaptation.
- FRAME
The frame shape can be in some cases the cause of non-adaptation. In some cases, the user is wearing some specific use lenses that require some technical aspects that are not possible with some kind of frames.
In addition, even if the selection of the mount is appropriate, it may be that the mounting or centering data is not appropriate.
In relation to the mounting parameters, it is important to:
1.Check the position of wear parameters if provided
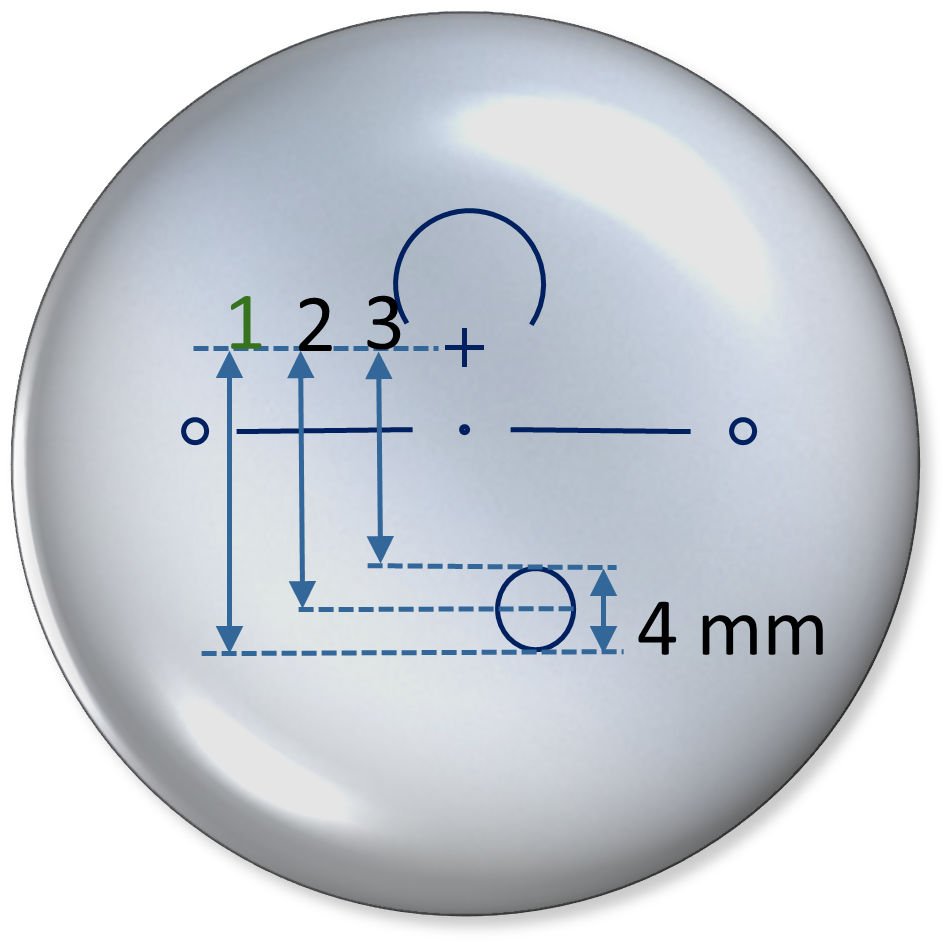
It is important to guarantee that the lenses are in the right position in front of the eye of the user. There are six different parameters to consider when taking into consideration the as worn position:
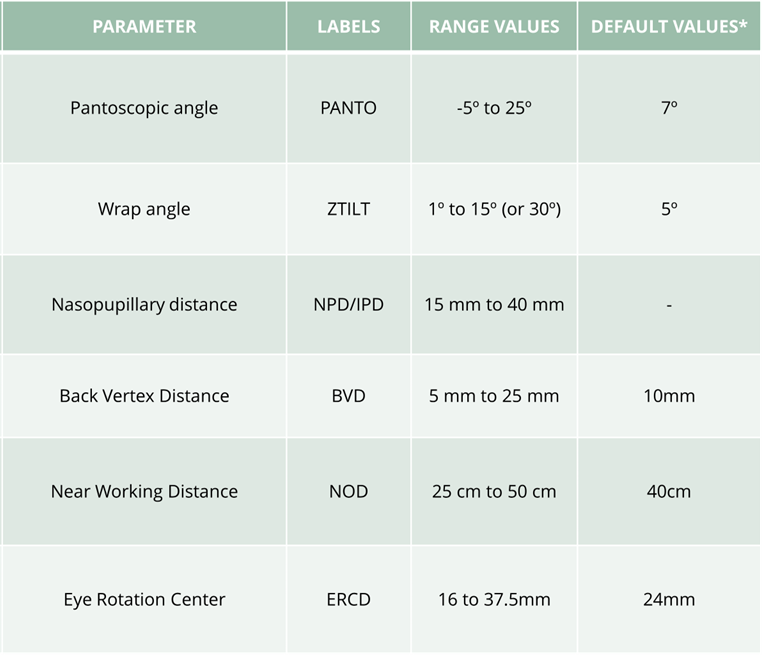
Image 2: As worn position parameters.
2.Check the pupillary distance
There are different checks to follow up when validating the pupillary distance:
- Mark with ink the engraving marks using the layout provided by the design supplier.
- Place the lenses on the rule. The nasal zone on the half bridge distance and the Fitting Cross measurement is the one must be measured to obtain the pupillary distances measurement. It is also possible to place the lenses on the rule and zero in the middle of both lenses. The pupillary distance is the resulting value adding half the bridge distance.
3.Check the Fitting Cross measurement
Validate the Fitting Cross measurement. Fitting height is used to define the vertical position of the fitting cross. So, to determine the Fitting Cross measurement is necessary to place the lenses on the rule. Zero in the fitting cross and check if the Fitting Cross measurement matches with the one in the job ticket. After that, check the horizontal position by placing the frames in the Layout. More than 5 degrees can be non-comfortable for the user.
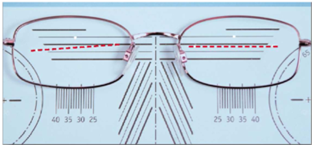
Image 3: Fitting cross verification.
LENSES
There are four different aspects to considering when checking the lenses:
- Prescription of the lenses.
- Manufactured lens.
- Corridor assigned.
- Different progressive philosophy than the previous used
The first verification that the professional should do it to verify the user prescription, the addition value, and the corridor length value.
The professional should be sure with a focimeter that the final lenses have the desired prescription.
With the aim to evaluate the tolerance of power, there are different tables that show the maximum power deviation at far, the cylindrical power deviation and the addition power deviation.
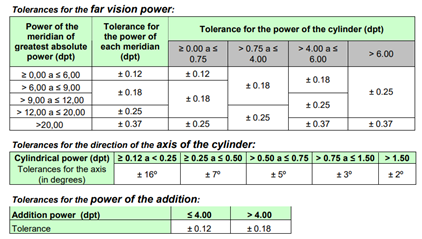
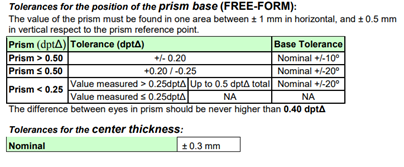
Image4: Manufacturing tolerances.
Furthermore, it is important to verify that the lenses were properly manufactured. The importance of these Error Patterns can be objectively quantified using the Go/NoGo feature of the A&R Dual LensMapper.
In addition, an incorrect corridor (too short or too long) can cause inconveniences to progressive lens users. To avoid non-adapt lenses, when choosing the ideal corridor the following items have to be taken into consideration:
- 18mm as a default corridor value.
- The previous progressive design and previous corridor value: Each lens design has their own corridor definition and to match two different designs from two different designers it is mandatory to be sure that the corridor equivalence is the appropriate one to achieve the best visual performance for the final user.
- The previous prescription.
As there is not a clear definition of the Corridor Length in the VCA standard, each lens manufacturer has a different definition:
How HORIZONS understands corridor: It is measured from the fitting cross until the bottom of the near zone circle which is 2mm below the NRP matching with the minimum fitting height.
1 – Corridor definition for Horizons: From 14mm to 20mm.
2 – Other corridor definition: From 12mm to 18mm.
3 – Other corridor definition: From 10mm to 16mm.
Image 5: Corridor correspondence.
BEVELLING
Check if there are rotations.
In case of any rotation in the mounting, the user wearing Progressive Addition Lenses will not find the corridor and the near area of the lens. Below some examples of the correct positioning of the Progressive Addition Lenses:
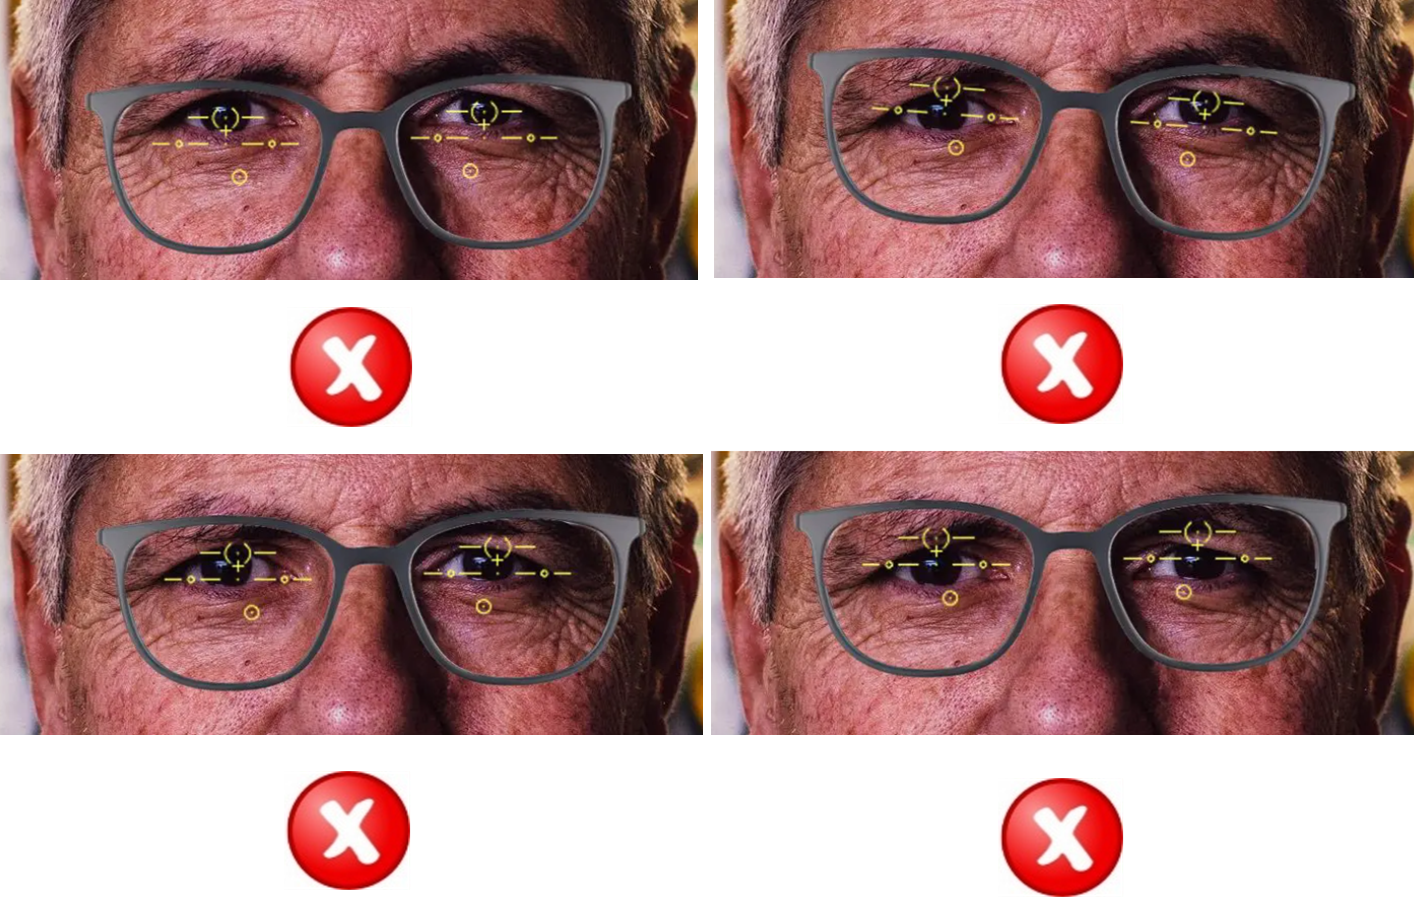
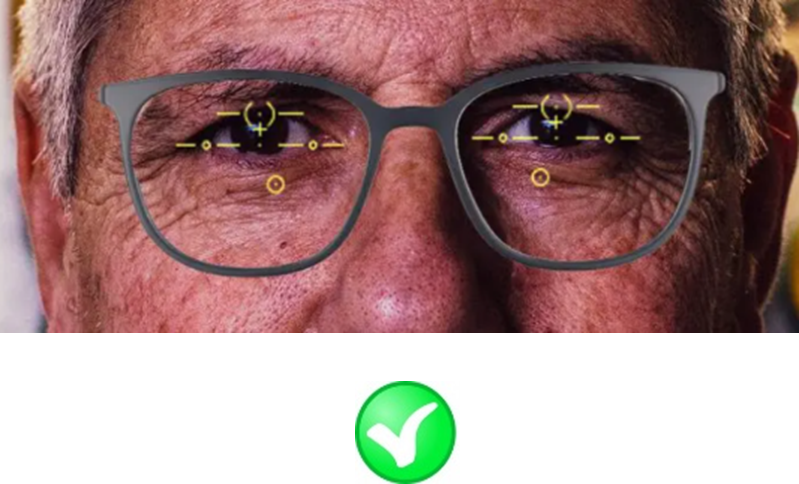
Image 6: PAL centration.
DESIGN
As mentioned, it is crucial to consider the previous progressive design to achieve similar or even better visual performance. If the user was wearing a soft design and now a Hard design, it can be a case of non-adaptation as the visual fields and the visual perception is very different in both cases.
CONCLUSION
To achieve the best adaptation, the described elements must be taken into consideration.
Achieving the best adaptation means providing the best quality to the optician, decreasing cost and time for the laboratory, and improving the visual performance for the final user and offering product trust.